Can you cut 1 Tonne of carbon pollution out of your life?
Take the challengeMy talented sister is sharing, a step by step guide to making your own cutlery wraps.
Written by Erin Rhodes aka The Rogue Ginger
I am selling these in my Starter Kits for Plastic Free and Zero Waste Living, and it was my sister who made them for the kits. She also made the bags too. I know there are plenty of people who are handy with a sewing machine (or a needle and thread) and would be interested in making these rather than buy one.
I am in talks with my sister about selling these individually - until then, enjoy the tutorial.
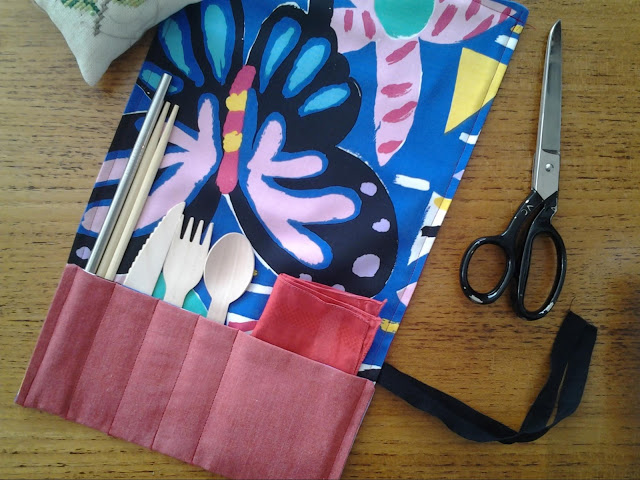
The cotton poplin is vintage Ken Done and a repurposed red canvas. Thanks sis!
Read next: How to get ready for plastic free July!
Cutlery wrap sewing tutorial
What you will need
Tools:
Sewing machine
Scissors
Pins
Ruler/tape measure
Iron
Materials:
Paper
Cotton canvas
Cotton Poplin
Thread
Cotton tape
STEP 1 - Draw pattern
You can make it as big or as little as you want depending on your needs. Below are the dimensions I used.
- 50cm x 25cm
- 1cm seam allowance
- Draw a notch for cotton tape insert 21-23cm up left side of pattern
- Fold line 11cm up
STEP 2 - Cut /Lay fabric
Iron fabric.
Cut 1 cotton canvas and 1 cotton poplin.
Cut 50cm of cotton tape.
Notch (2mm snip with scissors) appropriate markers such as seam allowance and cotton tape
parameters on fabric.
Right sides facing each other (poplin on top).
Fold cotton tape in half.
Place the folded end of tape in between the two pieces of fabric at the notch indicated.
Pin down.
STEP 3 - Sew
Sewing machine -Stitch length 3.
Sew the three sides.
Snip the 2 corners at an angle and cut away ¾ of the cotton poplin off the three sides. This removes some bulk when turning it out.
Turn the wrap out, use the scissors and gently push the corners out to make right angles.
Iron down corners and edges.
STEP 4 - Now to enclose the wrap
Stitching will be visible from here on. So you may change the stitch length to 4 as it is more aesthetically pleasing.
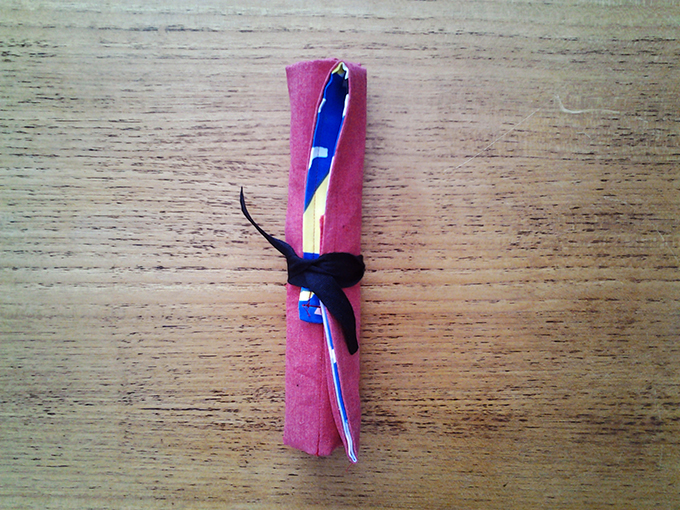
At the opening, fold 1cm seam allowance inwards, pin it together and iron.
Line up the foot of sewing machine to the edge of wrap to close this opening. this will be 7mm.
Now on the other end, fold up 10cm, iron and pin.
Sew from the folded end up (follow the edge as you did previously) both sides.
STEP 5 - Onto the pockets
From the left side of fold I make 4 cutlery pockets (3cm each) the remaining pocket is for the napkin (9.5cm)
Adjust pockets to fit your cutlery needs, just sew from the folded end up 10cm.
To fill up your kit, I recommend putting in some cutlery you have collected. Look our for places that have wooden takeaway utensils and keep them for your wrap. If you are going to put metal cutlery into the wrap, remember to take it out if you are carrying it onto a plane or you will loose all your cutlery! An old hanky can work for your napkin too. If you want to buy a straw, check out Biome's range.
If you have any questions about this tutorial, leave them below and my sister will answer them for you. Feeling keen to make a wrap? I'd love to see it. Take a snap and send it to me or post it to your social media with the tag #bringyourowncutlery
Read next: How to make your own re-usable fruit and vegetable bags
1 Million Women is more than our name; it's our goal! We're building a movement of strong, inspirational women acting on climate change by leading low-carbon lives. To make sure that our message has an impact, we need more women adding their voice. We need to be louder. Joining us online means your voice and actions can be counted. We need you.