Can you cut 1 Tonne of carbon pollution out of your life?
Take the challengeTimes are tough for the tiny-yet-important bee. Climate change, pollution and pesticides are causing bee colonies to disappear globally. Since the 1940's, bee populations have steadily been on the downhill. The US Fish and Wildlife Service have recently put forward a proposal to better protect the rusty patch bumblebee by listing the species as endangered, and with good reason.
Why bees are so buzz-worthy?
There's good reason there is so much buzz around bees. Bees are pollinators, which means they play a key role in the reproductive cycle of certain types of plants. In fact, they pollinate one-third of the food that we eat! Without bees, we can bid farewell to plenty of our fruit and veg options, coffee and chocolate.
Pollination works by transporting pollen from flower to flower. Bright, sweet-smelling flowers attract pollinators such as butterflies and bees. These creatures feed on the nectar produced by these flowers, brushing up against the flower's pollen. When the pollinator moves on to another flower, it takes the pollen with it, effectively transporting it to where it needs to be (the part of a plant called a stigma) in order to produce seeds and reproduce.
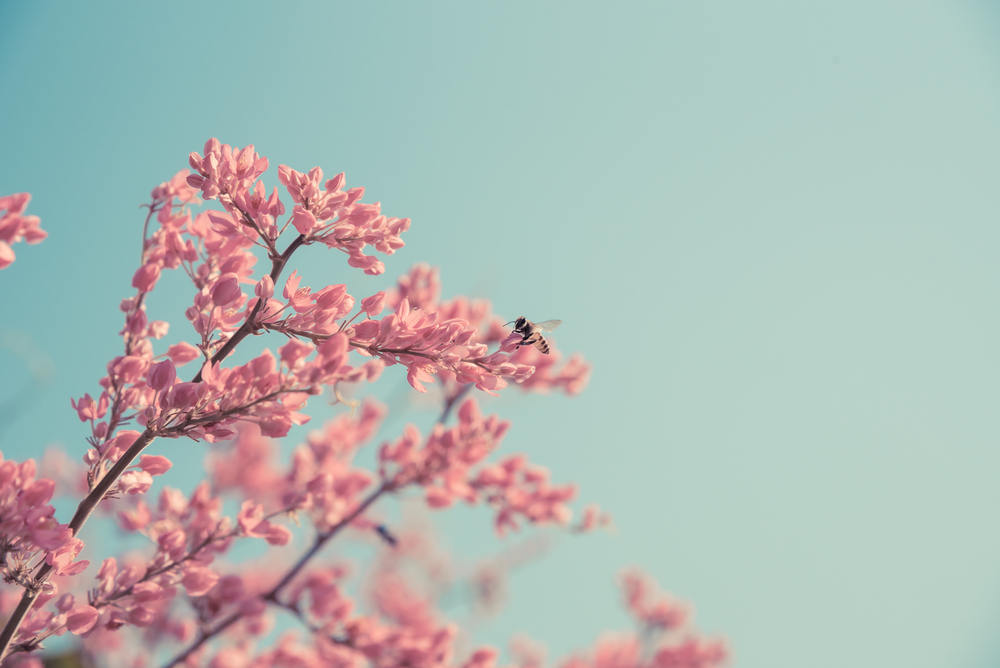
Bees pollinate one-third of the food that we eat! Without bees, we can say goodbye to coffee and chocolate.
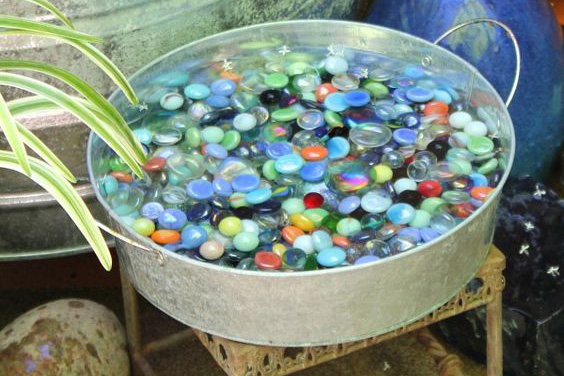
A tiny bath, for a tiny bug
Creating a bee friendly garden is a wonderful way to help bees, but there's more to this than growing flowers. The phrase 'busy bee' didn't spring from nowhere. Collecting pollen is thirsty work! Unfortunately, bees don't land with much finesse. By making a bee bath in your backyard you'll help our fuzzy friends stay hydrated and avoid crash-landing in deep water where they can drown. There are a few ways you can make a bee bath, and we've included the best two options below.
Bee bath #1
You will need:
A shallow dish
Stones or marbles
Plant pot
Fresh water
- Select a spot in your garden that's shady and protected.
- Turn your plant pot upside down and use it as the base of your bath.
- Place the shallow dish on top of the upturned plant pot
- Add your marbles or stones to the base of the dish
- Fill with fresh water. Add just enough so the rocks/marbles aren't submerged.
- Change your bee bath water daily, and give the bath a clean once a week.
Bee bath #2
This option is great for those that are time-poor and can't keep up regular maintenance of their bee bath.
You will need:
Mesh
Wine corks or another floaty material
Bucket
Fresh water
- Cut the mesh into a circle. The size should be a little smaller than the diameter of your bucket
- Staple the wine corks to the mesh circle so it floats
- Fill the bucket with water
- Float the mesh circle in the bucket so it rests on the surface
- Place your bee bath in a shady, protected section of your garden
- When it rains the bucket will fill up, yet the bees will still be in shallow water when they land for a drink! Check every few days and top up when needed.
Read this next: This Norwegian city has made its bees their very own highway!