Can you cut 1 Tonne of carbon pollution out of your life?
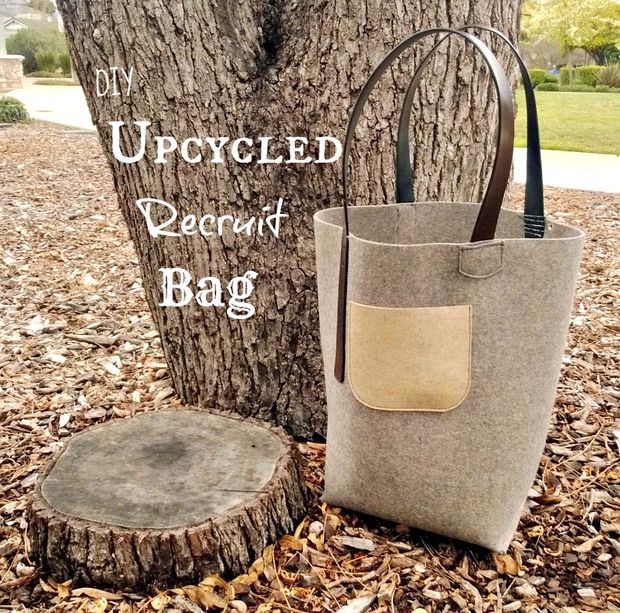
Take the challengeWho couldn't use an extra throw-it-all-in tote bag? In this tutorial, I'll teach you how to make you're own tote using 3mm felt and upcycled leather belts.
Felt is a wonderful material that is made by rolling and pressing sheep's wool together so the fibres fuse together to create a smooth, unfurling surface. This last bit is especially important: it doesn't unfurl at the ends! Its like magic! This means that you could cut it in any direction or distance and the ends will not fray or come apart because theres no threads involved!- Just wool. This makes for an outstanding sewing experience! With all the characteristics of fabric, but with the added benefit of extreme durability.
Note: if you will be trying to create this project using 3mm felt on your home sewing machine, you may have to use heavy duty thread and sewing needle, along with adjusting the appropriate settings. You may even need to hand-crank the entire project through because the motor on a home sewing machine may not be strong enough sew through such dense materials as leather and felt. You could also hand-sew everything together, using rubber cement to reinforce your stitches.
Let's get started!
Step 1: Cutting Outline
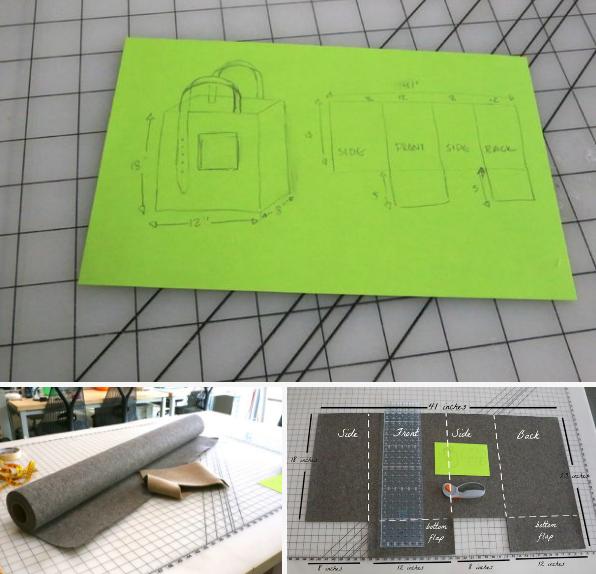
There are so many options and styles for totes, but I decided I wanted my tote simple but big. I sketched out a quick design and rolled out my 3mm felt and began cutting.
My tote would be made from a single sheet of felt, measuring 41 X `19 inches. Since sewing felt could get difficult, I didn't want to be piecing together too many different felt edges. This stuff is thick!
I wanted my tote to stand 18 inches tall, so in order to do this, I alternated lengths for both sides and for the front and back of the bag (See image for clarification). The sides I cut at 18 inches, but for the front and back I added 5 inches to the bottom, which would meet at a 1 inch overlap to create the bottom of the tote.
I used a self-healing mat to cut on, along with a straight edge (ruler) and a rotary cutter. Sure, scissors can cut felt, but since I was doing longer cuts, I thought a rotary cutter would leave the cleanest lines. Which it did!
I had a small piece of scrap felt in a different color, and decided to use this to create a pocket detail on the front of the bag. More on this later.
Step 2: Prepping Belts
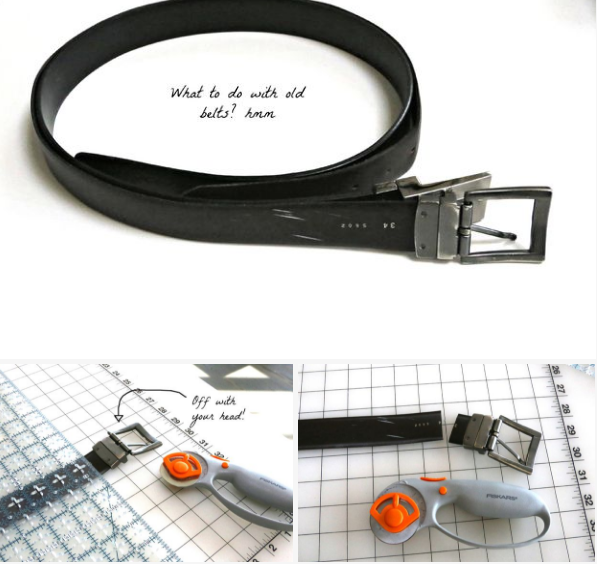
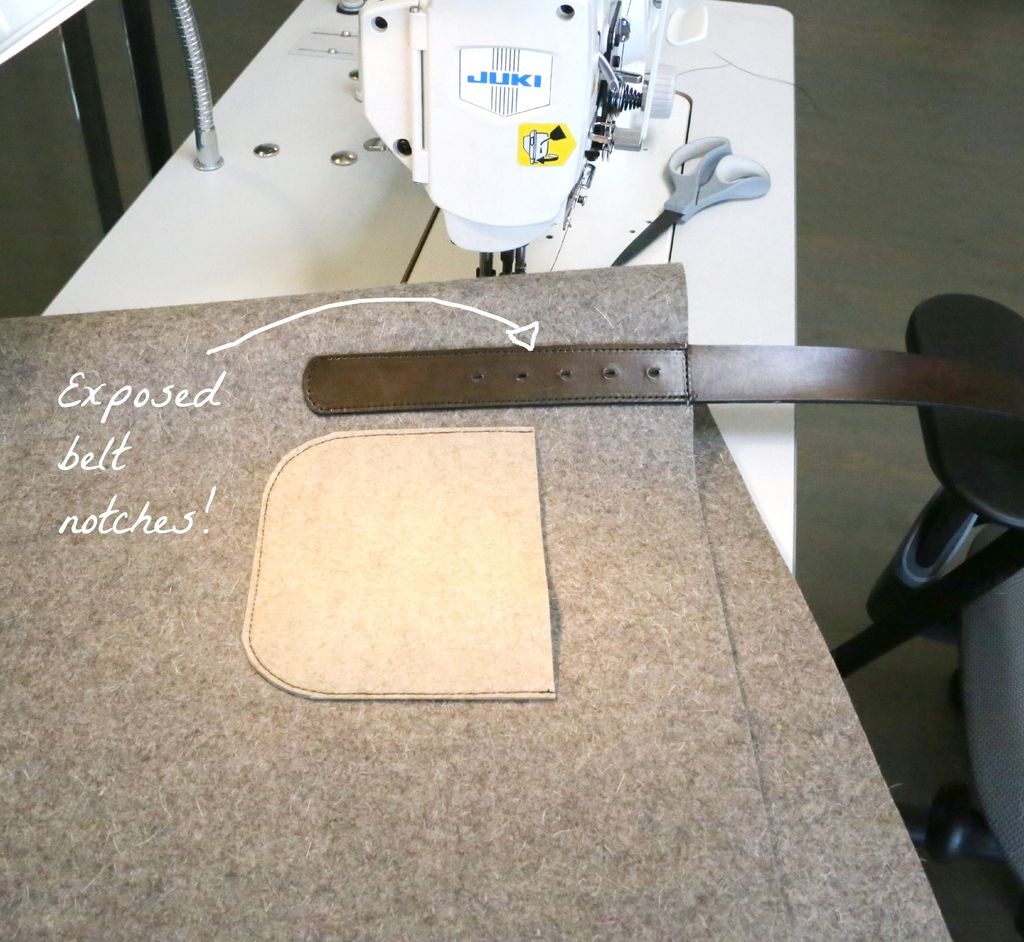
I got my hands on two mens' belt, made of wonderfully thick leather, that would work beautifully as tote straps, indeed these belts actually inspired this project!
I cut the buckles off the ends of the belts with my rotary cuter and straight edge ruler. Quick and easy! However, I decided the keep the rest of the belt intact, the part with the notches as well. I wanted the belts to be recognizable as belts even though they would now be straps.
Step 3: Sewing Pocket and Belts
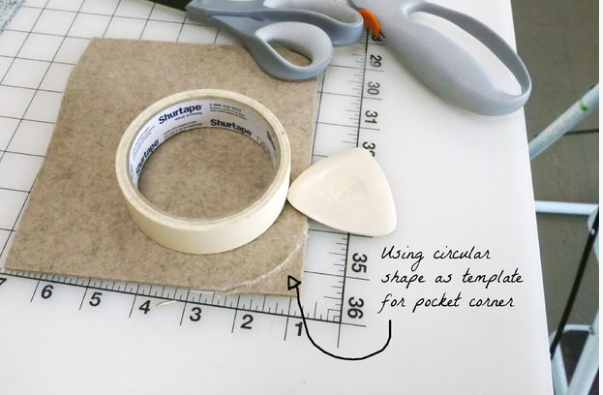
With my scrap felt, I used the circular edge of a roll of tape to trace on the ends of my slightly rectangular scrap piece. I cut this rounded edge with scissors. I did this twice to create the bottom of the pocket, then sewed this onto the front of the tote, deciding placement would be best a bit higher up.
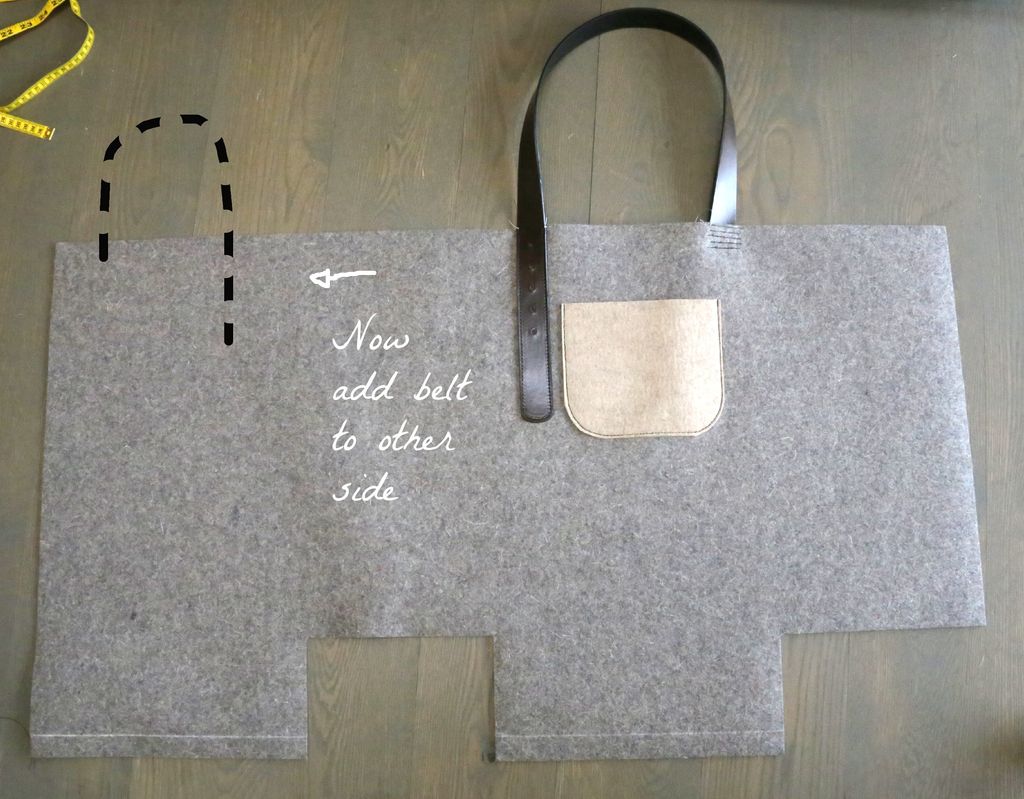
For the belt straps, I wanted the end with the notches to show, so I top-stitched this end on the felt. For the other end, the part that once had the buckle on it, I sewed that end underneath the other side edge of the front/back side. So, one end of the belt was sewn over and the other end was sewn underneath.
I sewed a few rows to attach the belt to the felt because this part would need as much reinforcement as possible! But later, I decided I didn't like the look of so many stitches, so I top-stitched a small patch of same colored felt to disguise the stitches (more on this in the next step)
Step 4: Sewing Strap Covers
First, I prepped the strap-felt stitchs by snipping all extra ends of thread. Then, using same colored felt, I made small patches, very similar to the pocket I sewed on earlier, even using the same roll of tape to create the bottom of the patches. I made two of these, one for each strap, then top stitched this onto the body of the tote.
The row of stitches, necessary, but ugly are now hidden beneath these patches!
Step 5: Sewing & Reinforcing Bottom
Remember those two longer ends from the original tote outline? Those will form the bottom of the bag by overlapping at a 1 inch margin. Measure out and mark this 1 inch margin with a piece of fabric chalk then fold over the felt so these two marked ends are meeting. Holding securely, sew this small overlap, more that once if you find it necessary.
Folds in 3 mm felt are never clean because the material is just so thick, this is the reason I chose to top-stitched everything on this bag, including the bottom. If you use traditional "right-ends-facing" stitchery, the felt will never have a clean crease, even if ironed down.
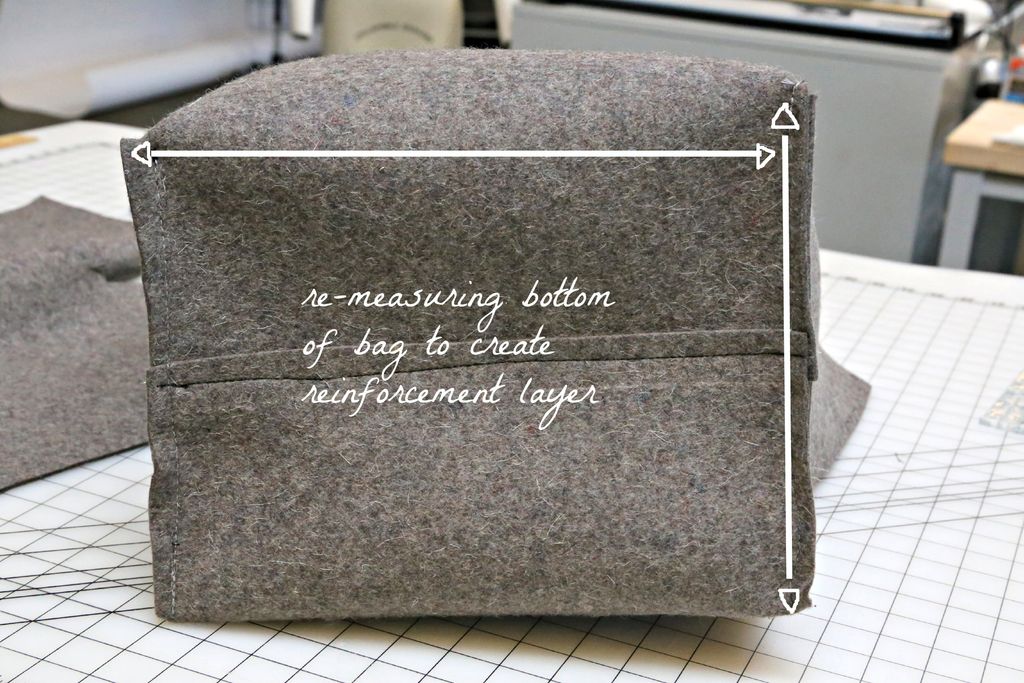
Next I re-measured my newly made tote bottom to confirm the measurements so I could make a reinforcement lining. I did this by cutting two sheets of felt, sewing them together, one on top of the other, and snipping the edges. I placed these sheets on the bottom of the bag, so now the bottom of this rather large tote was reinforced with 3 layers of 3 mm felt = 9mm thick bottom. Sounds solid!
Step 6: Sewing Bottom Sides
Now that my bottom is sewn and reinforced, I pinched the two other ends of the sides, and sewed them together. I thought my measurements were exact, but I had to trim the sewn edges with my rotary cutter to create one clean edge.
Step 7: Adding Snaps or Rivets
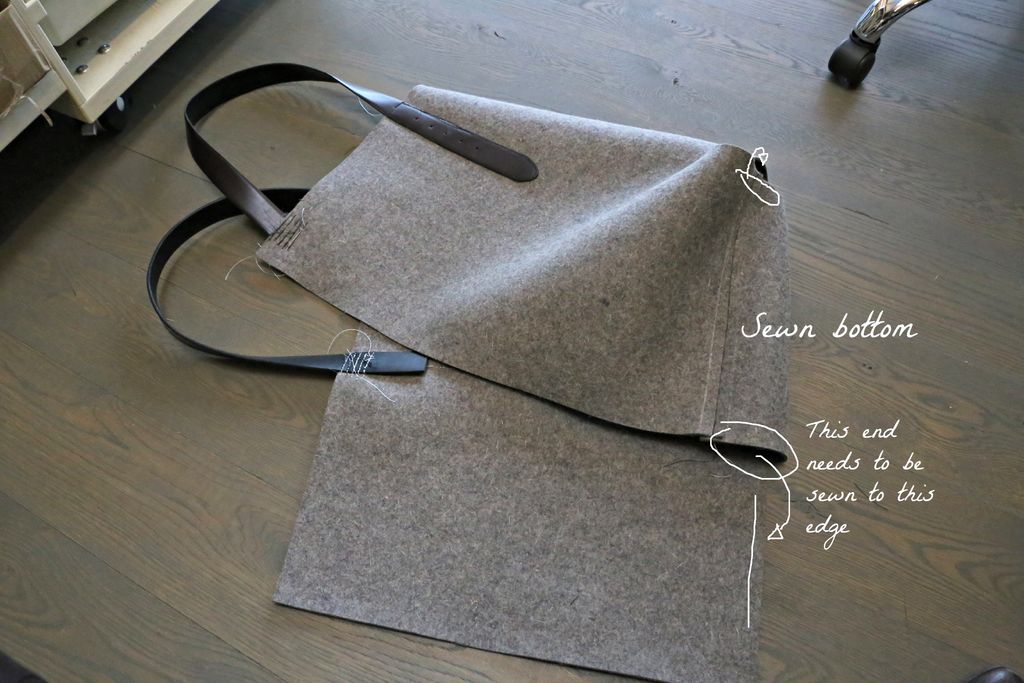
The tote is almost complete! Just one last step! You'll see that if you stand the tote up, there is one last edge that needs to be attached.
Rather than sewing the felt edges together (which I tried to do in an earlier version, but the results didn't make clean lines. Felt, you're so easy yet so difficult!) I thought it would be more aesthetically pleasing to add another material to help seal off this last edge. You could use anything from a single length of 2 inch elastic band that you could sew to either end, or make small holes in the felt and thread rope through both edges.
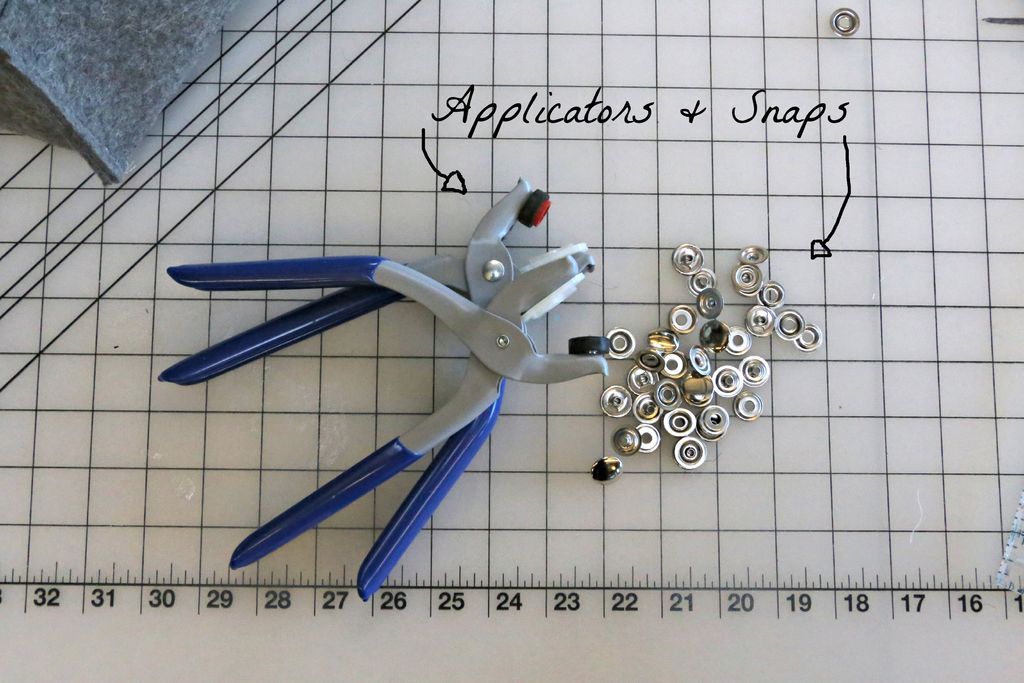
I decided to go with rivets, but since I didn't have any on hand, I used 1/2 inch heavy duty snaps. When closed, the snaps would just like rivets. This was slightly more work because I had to measure the edges perfectly to apply both the bottom and top parts of the snap buttons.
The tote measured 18 inches high, and I decided to space the snaps 2 inches apart, totally 9 snaps used. I started by applying snaps to the bottom most and top most ends, so the entire edge would be strong. You could play around with any design composition, but I kept mine evenly spaced.
And you're done!
This blog is adapted from an Instructables post by amalkhan
READ THIS NEXT: [How to] Make a basket out of plastic bags