Can you cut 1 Tonne of carbon pollution out of your life?
Take the challengeCertain seeds are notorious for being small enough to slip past the cracks in your hand. This can drive a person to overseed and thin out later, but that's ultimately a waste of seed. This is especially true if the seed is relatively expensive (looking at you, heirlooms) and you want to get the maximum amount out of a packet.
Certain seed providers will offer pre-pelleted seed so planting is much easier, but normally they're only available in super-popular and/or marketable varieties, leaving you to struggle with the teeny seeds if you go the unconventional route.
That being said, I wanted to try and make pelleted seeds with some of my favourite varieties of crops! The process is relatively simple, and takes less than a day to produce, and you end up with uniform, nutrient-rich pellets.
Alright, enough chit. Let's dive in!
This guide is based on the availability of natural clay soil. If this is unavailable to you, bentonite, kaolin, or red terracotta clay can work, however it will not be as nutrient-packed, which will place more pressure on your soil being fertile. Since I'm located in the US South, there's no shortage of red clay.
While researching the best way to make these, I've come across a few sources saying not to use this clay because it's high in iron. I've had germination success though with red clay, so I haven't seen any issues using it.
So what you'll need includes the following:
- Ice Cube Molds - I got a two-pack of these off Amazon for under $10. They make 160 pellets at a time, so getting the two means 320 seeds per setting. I'll get to why this is important later.
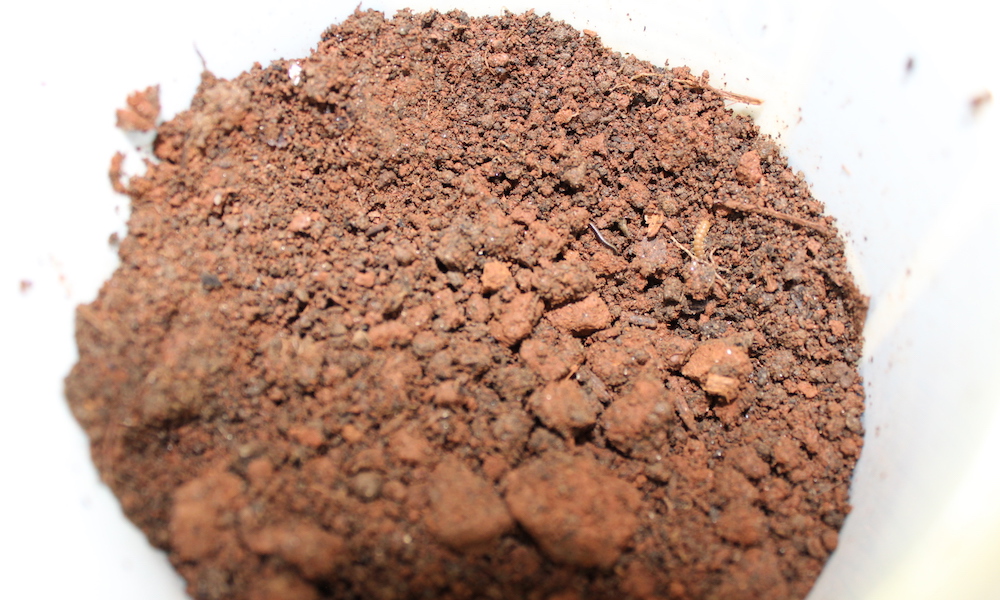
- Clay - As mentioned earlier, I just went outside and dug up some untouched clay soil in the front of my yard. You want to get soil that isn't on the surface, as weed seed or other detritus might get mixed in with the pelleted seed, making for unwanted competition for your intentional seed.
- Sifted, FinishedCompost - Either bagged or from your own pile, you'll need some compost. This allows porosity and air to penetrate the pelleted mix, which will allow the seed to thrive. Without it, the clay would be too compacted, making it difficult for the seed to germinate. You can also use worm castings if you have them.
- Seed - Of course, your seeds of choice! For this example, I'll be using a rare carrot seed provided from Baker Creek (rareseeds.com).
- Water (Keep a cup nearby, as the amount will vary.)
- A bowl or other vessel to mix everything together.
- A seed dibber, pen, or other pokey-object to make holes with.
Step 1
Prepare your organic matter. You can start by breaking up your clay soil if it's a bit dry. If you come across a rough chunk, I wouldn't worry much about it -- just chuck it aside, or try wetting it ever slighty to break it up.
Step 2
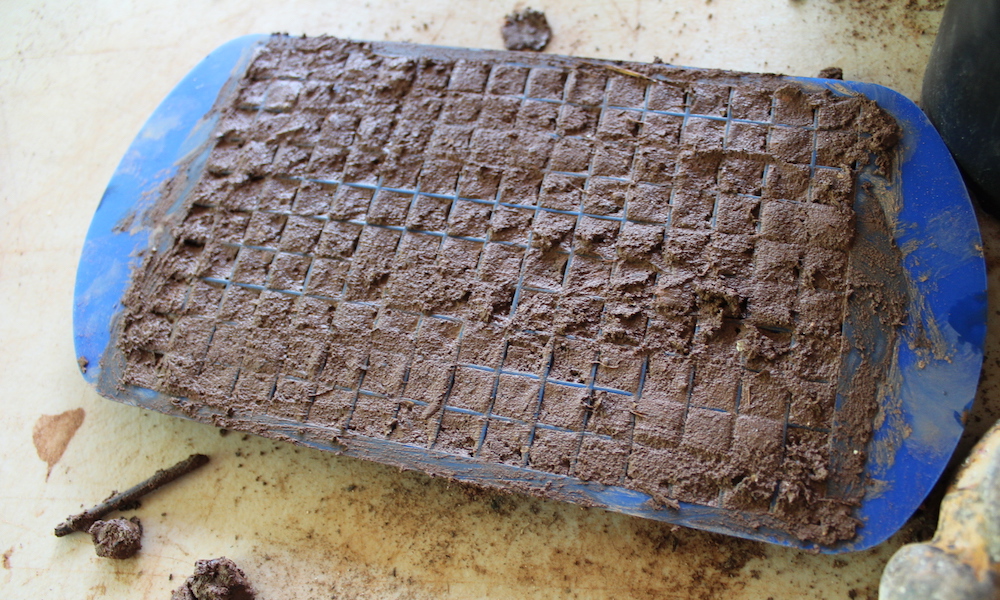
Mix organic materials. The ratio for these little pellets was 1/3 compost: 2/3 clay.
Mix the clay and compost together, adding water slowly. You're looking for a texture that isn't too wet, but sort of paste-like.
Take your moulds. Preferably with your fingers, start spreading your compost and clay mixture into the small squares, making sure to pack in the mixture.
You should work quickly, especially if it's a hot day, as to not risk your mixture drying out before you get your seed in.
As it gets full, you can spread it about until it's pretty much even. If you have a piece of plastic similar to that of a credit card, you can scrape the top off for uniformity.
Step 3
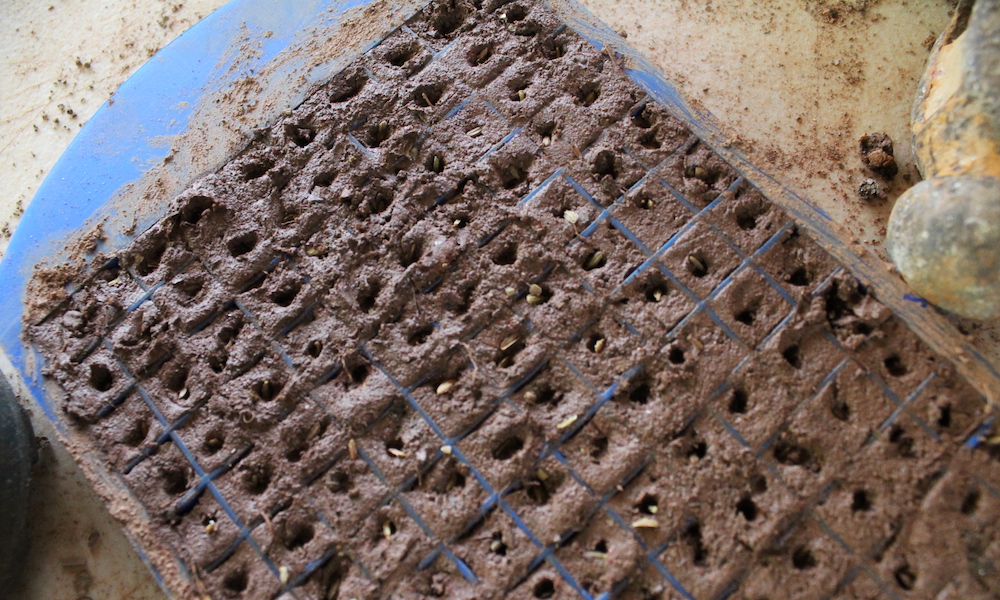
Make holes and plant your seeds. At this point, you might just grab a pen, or toothpick (depending on the size of your seed) to start making holes in the cubes. This might take some time, so get the music goin'.
After you have a hole, just pop in one seed. If you want extra security on a seed you know has poor germination, you can put in another seed. But don't place any more than two seeds per hole, because then it's a seed ball and not a pelleted seed. The whole purpose of these is to get the maximum amount of seedage per packet of seed, and also to eliminate unnecessary thinning of plants.
When finished, just use a little more of the clay and compost mix to top them off.
Step 4
Time to bake. Ideally, you wanna do the first part in the shade, and then place them outside on a sunny day.
If you're stuck in a place with eternal clouds like Seattle or Portland, you can dry them in a dry, shaded place, but it will just take a lot longer to dry.
I set these out here for roughly 2-3 hours on an 85 degree F day and they were good to go.

Step 5
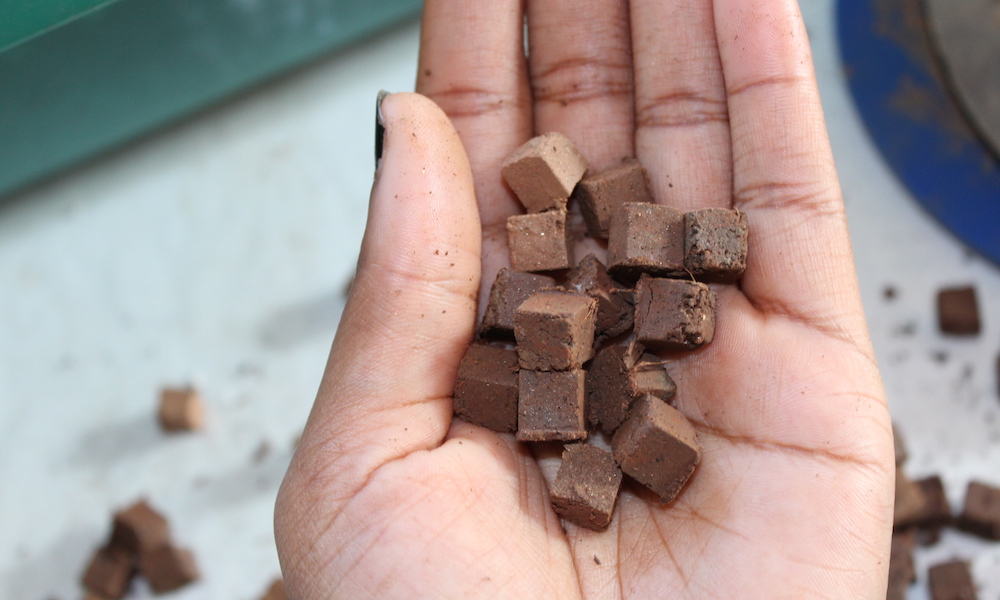
Pop them out and plant! When they're dry, you can pop out a corner to test. They'll be completely dry. Since the moulds are silicone, they'll all tumble out voluntarily, ready to go in the ground.
To store them, keep them in a cool, dark place, preferably in something like a tin canister used to store loose leaf tea.
When it's time to plant them, plant them the same way you would a bigger seed, but still following the directions of depth pertaining to the seed you're planting.
And that's it! They're really simple, and I've had success with them, especially with carrot and lettuce seeds.
That's really all there is to it! Making these pelleted seeds have helped me prepare and space my crops w/o having to worry about thinning. Sure, there's an upfront cost in time, but I think it pays for itself later. As a market gardener, this project has definitely helped me be a bit more efficient, and I hope you all can use it too!
Article originally on Instructables by TheFloraGoth
Read this next: 10 Companion Herbs To Plant In Your Garden
We're in a climate emergency and it's going to take all of us to get out of it. That's why 1 Million Women is building a global community of women committed to fighting climate change with our daily actions. To join the (free) movement just click the button below!